Articles & Insights

Build Your Own Pole Barn
Building a pole barn is big job and should not be taken lightly. But with some careful planning, a little experience and the proper tools – it can be fast and economical way to add a permanent building to your property for storage, agriculture or even residential use. While often referred to as a “pole barn”, the better terminology today would be “post frame structure” since traditional poles are rarely used anymore. These posts/columns are the most important part of any pole barn as they will combine with the trusses for the structural integrity of the building.
While building your own pole barn can be a rewarding experience, do not overlook the importance of proper engineering, design and materials in your pole building. Many online companies are eager to sell you a building package without consideration of your wind loads, snow loads, soil conditions and building codes. Advertising “the strongest columns” or “the best trusses” won’t be worth much when you are facing 80 mph wind gusts without the correct calculations!
How to Build Your Own Pole Barn:
Create your building pad.
Your pole barn needs to be installed on a flat surface that is well drained. For most installations this will include removing the topsoil from the building location and adding a crushed rock base course to level the building pad. A raised building pad will ensure proper drainage; and in states with a freeze/thaw cycle you will need to ensure that your posts are not moving with the frost cycle. While most pole barns will have the post buried into the soil, you can also build your pole barn on a concrete foundation with the proper brackets. After your pad is constructed, you will need to lay out your building with stakes ensuring that your corners are square. You can verify this by measuring your diagonals. If they are the same measurement, you will have just used the Pythagorean theorem to lay out a square building!
Install the posts.
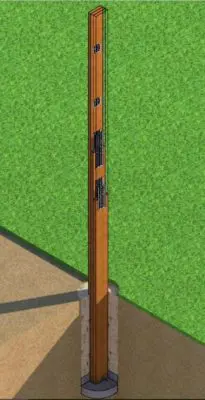
Walters Column System with a Ball Footing and Plates
Your building plans will detail the location, hole diameter and depth (below the frost line) of your posts. While the holes can be dug by hand, it is much easier to use a power auger. A typical hole is around 4 feet deep – but that will vary depending on your soil type, required loads and your regional climate. Ensure that your posts are installed on a footing and with an uplift anchor to limit the vertical movement on your posts. Brace posts as needed while continuing your building process. You will also need to ensure that the top ends of all of the poles are exactly the same height. This is often done after the poles have been set by cutting the top of the posts to the correct height.
Add beam and bracing between posts.
With your posts all installed at the same height and a perfectly square building, you will need to work on installing the horizontal beams. These “girts” (usually around 36″ apart) transfer wind loads to the post frame and are used to fasten the steel panels with screws. You will also work to frame any window or door openings at this time.
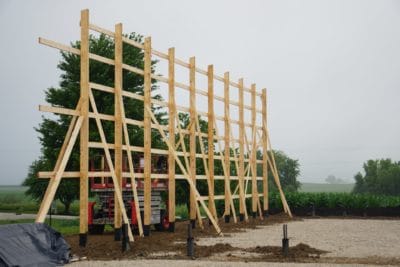
Install your trusses
The identifying feature of a pole barn is the “post frame”. This refers to a single, joined structures of two posts opposite of each other connected by the roof truss. This post frameprovides the structural integrity of the entire building. The installation of trusses can be a dangerous job. With the correction equipment and following the installation instructions and recommendations, you can successfully install the roof trusses. Use the building plans to determine truss bearing height and prepare the column to accept the truss at that height. While you are installing the trusses, you will want to install the “purlins” as you go to provide more structure to the building. The purlins are just like the girts as they are horizontal cross beams between the trusses that carry roof loads and are used to fasten the steel panels with screws.
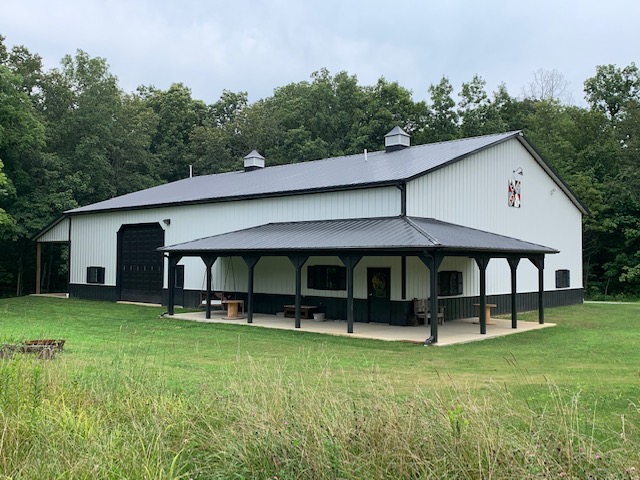
Install the steel panels and trim.
Post Frame Wall
The framing is done and all that is left to do is install the steel panels and trim. A cordless driver with a magnetic tip makes for quick work of the washer-head screws. Be sure to drive your screws straight to prevent leaks. Install the roof steel and trim first. After completely installing the roof, continue with wall trims and steel side panels. Walters Buildings uses a 28 gauge steel G-90 steel with a 1″ rib pattern 12″ on center. There are many other steel panels on the market, but after the time you’ve invested in constructing your pole barn – we recommend using the highest quality. You can read more about our Steel Panels.
After you’ve completed your first pole barn, head over to our Careers sections and fill out an application. Building a pole barn is hard work and we are always looking for people with a passion for the industry!
More Recent Posts


Ready to Start Your Own Custom Project?
Contact our project management team today for a personalized quote and start planning your dream building with Walters.


